Thursday, December 30, 2010

Christmas Aftermath....

Wow.  In the words of my mom, apparently "Santa hit the Nolan household and stalled".  Or at least that's what it looked like when we arrived to "Nonie and Grampy's" house on Christmas afternoon to a mountain of presents - mostly for Heidi and her cousin Connor, of course.  When we got back home and unpacked everything, I was left with the dilemma of where to put everything.  Not to mention the fact that Robb and I had given Heidi a beautiful wooden play kitchen for Christmas, which, while beautiful, also contributed to the massive amount of toys in the playroom/family room/sun room.  I knew that the storage that I had in place before Christmas wasn't going to be able to cut it for the aftermath of Christmas toys.  While Heidi did receive a beautiful toy box handcrafted by her great-grandfather, it wasn't the best solution for toy storage for all of her toys, since they all wouldn't fit in there, and she currently isn't tall enough to reach in to choose the toy she would like to play with.  Here's a couple "before" shots  - meaning before a storage solution, but "after" Santa's visit:


See how her toys are all just piled in the toy box?  I wanted to find something that would better display her toys so that she could choose the toy she wanted - instead of pulling me by the arm, and pointing and grunting until I correctly provide her with the toy she had been looking for (which was her chosen method when her toys were stored using the above method).  A friend of mine (thanks Emily!) clued me in to the IKEA Expedit series of products - specifically the 2 x 4 cube bookshelf, as pictured here:

image courtesy of IKEA

So, the day after Christmas, we made a family trek to IKEA to pick this up  - at $69, I considered it a bargain.  It was super easy to put together, albeit pretty heavy, and I think it looks great serving as our sofa console table/toy storage shelf - the dimensions were similar to the dimensions of our console table that was there previously (which I just sold on Craigslist, together with the matching coffee table, for $100!).  Here's how Heidi's play area looks now (when she's sleeping of course - when she's awake and playing , all bets are off!):


I'm currently searching for a nice, thick 5x7 rug to put in place of the rug/mat hodge podge that's going on there now, but for the moment, the rug/mat serves its purpose by creating a barrier between Heidi and the ceramic tile floor!

I know it's been awhile since my last post - in addition to spending time with my family, I've also been working on several additional projects concurrently, which I hope to unveil in the coming days, so stay tuned!


Wednesday, December 22, 2010

You light up my life....

....that's right folks, today is the day.  Remember my $5 craigslist lamps that I talked about here?  Here's a quick reminder of what they looked like before:


Well, after some cleaning,


And sanding,


And (spray) priming,


and (spray) painting,


Here's the finished product (pictured next to the one that is still in its original form):


 And in its final location (for now at least!):


I chose yellow for the color in order to pick up the yellow flowers in the above pictured pillow - I'm going with a mocha/walnut/sea (?)blue/yellow color scheme in the living room.  I'm not totally in love with the lampshade, but it was on sale at JC Penney for $20, so I snagged it - I may swap it out for a similarly shaped white shade in the near future.   Here's the cost breakdown:

  • Lamp - $2.50
  • Shade - $20.00
  • Cleaner - free (I already had on hand)
  • Sandpaper - free (already had on hand)
  • Spray primer - $3.44 
  • Spray paint - $3.44
TOTAL COST: $29.38

Not bad, if I do say so myself - and I'll bet that if I had been more patient, I could have found a shade at Goodwill or some other thrift store for much less...

I'm not going to dive in to the other lamp right away - at the moment, there's no place to put it in the living room, so it may get an entirely different makeover once I figure out where it's going to go.

Tuesday, December 21, 2010

Craigslist Find #3 - White Chairs

In searching for accent chairs for our living room, I stumbled across a pair of white chairs - here's one pictured below:

At 2 for $45, I considered them a steal!  I hadn't initially planned on adding chairs to our dining "nook" in our addition, but I figured it would be good to have the option to seat more than 2 people at the dining table in that room (especially once Heidi starts eating dinner with us - she will need  a place to sit, as I'm planning on transitioning her from her high chair into her travel booster seat soon for space reasons). 

While in the process of purchasing the chairs, the former owner informed me that these chairs were initially put into use/repurposed for an episode of "Trading Spaces" on TLC featuring a Capitol hill row home- how cool is that?!?  Here's how my "famous" chairs look at our dining table:


Even though the chair fabric doesn't exactly match the patterned fabric in the room currently, the colors in the fabric do complement the overall color scheme (greys, yellows, blue/greens), so I think I'm going to leave it as-is for now.  I may reupholster them later on if I find a fabric that I really love, but it's definitely not a priority for now - I'm in the process of painting one of my lamps that I mention in this post - prepare for the big reveal tomorrow!

Wall Art - the Process.....

So I promised  a post on the step-by-step process that went into the wall art in Heidi's room - so here it is:

I knew that I wanted to somehow stencil a large damask pattern on the wall above her bed, so I first spent about 2 hours Googling "damask stencils" to find one large enough to cover the space above her bed.  When that search was fruitless (I found lots of damask stencils, but none big enough), I went another (more labor-intensive) route.

I purchased a damask stencil from Michael's (this particular stencil is comprised of 2 identical stencils, but I just used one side, since I only wanted one pattern on the wall):


I then tried transferring the stencil onto a piece of paper by using black paint on white craft paper, but that was a disaster (the paint bled like crazy).  So, I resorted to the more labor-intensive process of transferring the stencil to a white piece of cardboard using a black Sharpie:


Here's how it looked when I was finished:


Then, I had the good folks at Staples convert this picture into a transparency for me for under $5 (see where I'm going with this?):


 (please forgive the picture quality - the bright spot in the middle of the transparency is from my flash)

Then, courtesy of my sister, who at the time was an elementary school teacher, I borrowed one of these dinosaurs (it wasn't being used in a classroom, since teachers nowadays are much more high-tech than this - it was collecting dust in a storage closet, so I was happy to put it to good use for a weekend!):


image courtesy of wikipedia

Picture the wall above her crib acting as the "screen" in this case - I balanced the projector atop several textbooks, which were then balanced atop her changing table, in order to project the image at the appropriate height and not skew any of the sides.  I then proceeded to "color in" the shadows cast by the transparency with a small paintbrush and white paint.  It ended up taking about 3 coats of white paint to fully cover the green wall color, and it was definitely a TEDIOUS process which required very steady hands, but I think it was totally worth it in the end:


Sunday, December 19, 2010

Our House: Before and After

For those of you who enjoy a good Before and After pic - check this out:


This was our house circa 1999 - when the previous owners purchased it.  They poured their blood, sweat and (I'm guessing) tears in to the place, to make it look like what it did when we purchased it in 2008:


Isn't that crazy?  They basically took the roof of the main house up 2 stories - we have 9 foot ceilings in all of our second story rooms, and there's also a full-height attic above (that's the row of windows at the very top of the house).  They added the porch, changed up the main downstairs windows and door on the main level, and that's only what I can tell from the outside!  I wish I had "before" pics of the inside!  It just goes to show you that a little vision goes a long way - I can guarantee you that, had Robb and I seen the above picture when we were house hunting, we wouldn't have given the house a second thought.  Here's to the former owners for doing all the hard work for us :-)

Thursday, December 16, 2010

Heidi's Room

As a tribute to this blog's namesake, here's my official post as to the evolution of her bedroom.  This probably should have been the first post, but oh well!

So, to rewind a little, when we purchased the house, there were (and still ARE - we're not THAT ambitious) 3 bedrooms upstairs - two large ones, and one on the smaller side.  We always said that the smaller room would be perfect for a nursery (and with a little creativity, will make a perfectly adequate child's room as well - and maybe a teenager's room as well, depending upon how long we stay in the house!).  So, before Heidi was a twinkle in our eye, we had her room all picked out.  The original color was a pale blue - Robb argued that if we found out that we were having a boy, the blue color should stay, but I argued that I would still like to paint the room to really personalize it.  Luckily that argument never progressed, since we found out that we were having a GIRL!  Here's what the room looked like before:


The above pics cover 3 of the 4 corners of the room - what you don't see in these pics is the closet, which virtually takes up one full wall, with double bi-fold doors (you can sort of see one side of it in the top pic), and the bedroom door ( I took the middle pic while standing in the doorway angled to the right towards the corner) .

Our first step was choosing bedding, which would guide our color choices going forward.  I instantly fell in love with this bedding from Target:


Photo from Target site - use link above to access

I loved the bright colors, as I've never been a big fan of pastels in general, and I know that newborn babies appreciate strong colors (since they can't see well when they're first born), so I figured that this bedding would be perfect - so I added it to the baby registry. 

Next stop - wall color.  Robb's only request was that we not choose pink for the walls.  Hence the green color you see in the third pic above, which we matched to the green in the bedding.  The exact color is "Herbal Garden" by Behr.  It took about 3 coats to really cover the blue, but when we were finished, we were pretty pleased with the result:


I love how the green makes the moldings and floor "pop" - kind of a similar feeling that I got when we painted our old bedroom purple, which I talk about in this post.  Total cost for this change - around $20 for the paint.

Our next stop was furniture.  Since the room is pretty small, and has 2 windows which eat up wall space as well, we knew we had to limit the amount of furniture we put into the room.  Luckily, the custom closet in this room is more than adequate to accommodate clothes, toys, and then some (by "then some", I mean some of my clothes!).  So we decided upon a crib, changing table, and glider/recliner (since the room wasn't big enough to accommodate a separate ottoman to go with a standalone glider, we opted for a glider/recliner combo).  The furniture we chose was definitely not top of the line, as our intention was not to have it "grow" with her, as so many furniture places like to try to sell you on - knowing myself, I knew that I would look forward to changing up her bedroom set as she got older.  And this way, when baby #2 comes along, he/she will be able to use this baby furniture as well!  We opted for the Davinci Emily crib & changing table in white from http://www.simplybabyfurniture.com/ -


They offered (and still offer!) free shipping on all furniture, and their price was hard to beat!  The only complaint I have, which I was aware of going into the purchase, is the fact that the wood is soft, and dents easily - particularly when your child likes to use the crib rail as a teething ring!  But overall, I've been very happy with this set.  I chose the white because I really liked how the white looked with the green walls.  Total cost for the furniture - FREE (thanks to my in-laws who so generously offered to purchase the set for Heidi) - but it's currently retailing for under $400.

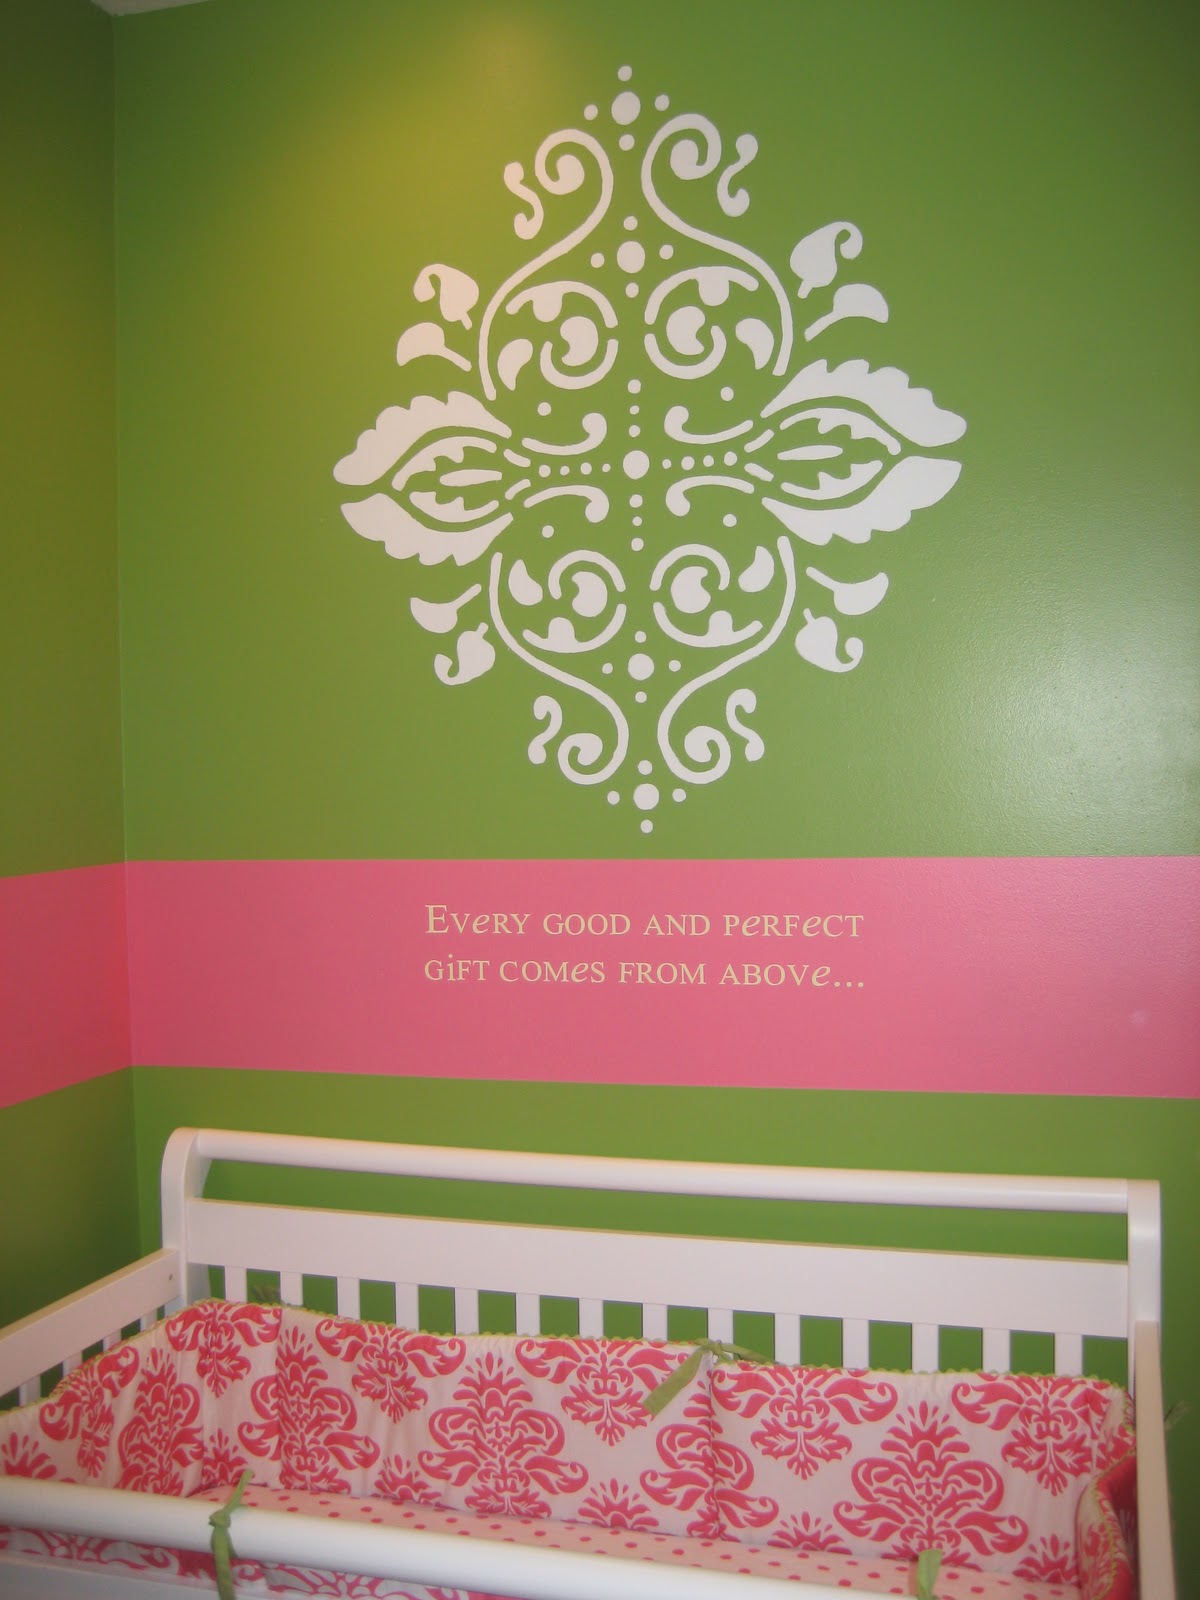
Once we got the changing table and crib assembled, it was time to add a little more "girly-ness" to the room.  While Robb didn't want the entire room to be pink, he did consent to letting me paint a wide horizontal pink stripe around the perimeter of the room - I'd been wanting to try painting stripes somewhere in our house, and figured that this was as good a choice as any.  I made sure to start the bottom of the stripe a couple of inches above the top of the crib, so that it wasn't hidden by the furniture, and I decided upon a width of 15" to make it strong enough to stand out in the room.  So, armed with painters tape and a laser level, I went to work measuring and taping.  That was the hardest part.  Once I got everything taped, the actual painting didn't take too long - it only took 2 coats to cover the green.  The pink I ended up choosing was "Watermelon Pink" by Behr, pulling the shade of pink from the above pictured bedding.  Here's the finished product:


Even though Robb was skeptical at first, he did agree that he liked how it turned out.  Total cost - about $10 - I only needed a quart of paint.

Next up - glider selection - here's where I derailed a bit.  I went with a friend to Baby2Teen Furniture in Manassas (if you've never been there, I highly recommend it).  In addition to a great selection of gliders, they also carry high-end furniture, strollers, car seats, accessories, bedding - you name it.  I sat down in one glider/recliner, and fell in love with it instantly. 


Photo from Best Chairs site - use link below to access

It is made by Best Chairs, from their Storytime Series.  The specific model is TRYP.  It is sooo comfortable.   I didn't choose the upholstery pictured above though - that's where this gets interesting - at least it did for me.  When I walked in to the store, I immediately fell in love with the upholstery pictured on this chair:


It's a damask pattern, and the green matches the color of Heidi's walls almost perfectly.  Problem was, this print was in no way going to successfully complement the crib bedding I had already selected (but not yet purchased or been gifted).  So, right then and there, I decided to scrap my bedding choice in favor of the chair.  I crossed my fingers that I would be able to find something that would sort of work.  Cost of the chair: not cheap - around $600.  This was our one and only splurge in the room - we figured that we would be using the chair multiple times a day, and we have been for over a year now.  We also figure that we could easily incorporate it into a family room setting when the time comes.

I didn't need to search long for suitable bedding - I was giddy when I found this bedding, also from Target, and the same brand as the previous bedding I had chosen:


Photo from Target site - use link above to access

The pink in the bedding ended up matching perfectly with the pink stripe on the wall, and the damask print matched the glider print.  I was elated.I was a little concerned that I wouldn't use the bumpers in the crib for long after Heidi arrived, based upon things I'd been hearing from my friends, so I tried to figure out a way to incorporate the damask print elsewhere in the room as opposed to just in the bumper.  I decided I would make valances for the windows out of some crib sheets from the set, but my major undertaking was to stencil a damask pattern on the wall above the crib (more about the specifics of that project in a future post).  Additionally, I found baskets from Michael's which fit perfectly under the changing table - I sewed fabric liners for them and added some grosgrain ribbon to dress them up a little.  I also obtained a (free!) white antique looking mirror from my sister's MIL, which looks great in the room.  I constructed a peg shelf and some self-made letter frames (more about that project in a later post) and hung it above the changing table, and purchased some shelves from Walmart to hang above the recliner to display stuffed animals.  A quick trip to HomeGoods for some bright pink accents (blanket and picture frames and ottoman that we use as a side table, and I considered myself ready to welcome Heidi into the world!  Here's the finished product (with the exception of the bookshelf which I just recently added - see this post ):


I hope you enjoyed watching reading the evolution as much as I enjoyed the process!  Like I said, I'll post more as to the specific projects I undertook in this room in future posts....

Tuesday, December 14, 2010

Another Junk Drawer Makeover....

So maybe I'm carving my niche in the virtual world with yet another Junk Drawer Makeover post (see the original post here), but here it is.  My dear sister Kelly let me tackle her troublesome kitchen junk drawer - all while we were watching an episode of Modern Family ( I LOVE that show!).  Here's her drawer before:


And here I am in the process of reorganizing the drawer (these pics are courtesy of my brother-in-law, Sean):


And here's the AFTER shot:


Here's a few tips that I found helpful when organizing this drawer:

1) Ziploc bags are your friend!  For drawers with a lot of cables/phone chargers/headphones, a good way to keep them untangled and in easy reach is to put each unique item in its own bag, and label the bag's contents with a permanent marker.  You can see from the above picture that Kelly's cables and cords are all located in the upper left section of her drawer, using the methodology I've just described.
2) Don't waste money on fancy drawer organizers when you have plastic food storage containers - here's a use for those food storage containers for which you can no longer find the top - use them in a junk drawer to keep like items with like items.  In the photo above, I've used plastic containers to group pens and pencils, markers, notepads, and miscellaneous hardware/tools.
3) Apparently, as evidenced by this pic, in Kelly's case, you can never have too much electrical tape!

Sunday, December 12, 2010

A little bit of nostalgia...part 2

Continuing on from my post here, here's the upstairs tour of our lovely former DC row home.

The Stairway/Landing:

You may wonder why I'm spending any time talking about a stairway.  Well, this wasn't just any old stairway.  First off, it had a really neat feature - an up lit "museum" ledge, shown below, that served as a unique architectural element to an otherwise fairly nondescript home.  We used this ledge mainly to hold plants - we had 2 cats who were always trying to get into the plants, and this was one of the few places in the home that they couldn't get to!  The second neat feature was the fact that there was a skylight in the roof directly over the stairwell - this allowed a great deal of light to enter the home, and really made it feel a lot more like a loft living space than a row home - we used to like to describe our house as "DC row house meets NY city loft" - not that we had any experience living in a NYC loft!  Here are the pics - the hole in the wall you see to the right is actually an interior "window" into our bedroom - very cool feature:


Master Bedroom:


Here's our master bedroom.  First things first - the main reason that we chose purple as our wall color was due to the fact that our original bedding was grey/black/white/purple striped bedding from Nautica - a gift off of our registry.  However, it didn't hold up very well, and we ended up returning it to Bed Bath and Beyond (this store has the GREATEST return policy EVER!).    But, we liked the wall color, so it stayed, and we went with white/black bedding and accessories so as to not compete with the wall color.  I'm sure this was probably the first thing the new homeowner changed about the house, but that's fine with me - owning a home is all about making it YOURS, right?  As I mentioned above, I loved the interior window in our room - complete with wooden shutters which could be closed for privacy if you had company.  Since it was really only the two of us most of the time, we kept the shutters open.  The other shutters you see on the exterior windows were original to the house, and existed throughout the home - I liked the rustic feel they lent to the house, and put them back up even after we had to take them all down after having all of our windows replaced.  This room also had 2 closets in it - a rarity in DC which we loved.  I did end up eventually taking over both of the closets in this room and relegating Robb to the guest room closet, but oh well...

The Upstairs Foyer:


This area between our 2 bedrooms served as a pseudo-office for us, as you can see from the desk in the lower picture.  You can also see in the lower picture how we used to use the metal office organizer "rack", which I talk about in this post.  In the top right of the top picture, you can see a curtain just outside the master bedroom door - this curtain was hiding a floor to ceiling bookshelf, which we used for additional storage.  The doorway you see in the middle of the bottom picture leads to our one and only full bath/laundry room (as our washer/dryer was in the bathroom as well).

The Guest Bedroom:


We never really used this room to its fullest potential, I'm sad to say.  The layout was always a bit awkward, which made furniture placement tricky, and we didn't feel the need to invest in a guest bed, since we didn't have overnight guests that often, so it ended up being used as a second family room.  The wall color we chose for this room was "Corn Husk Green" by Behr.  I found the red bench at a bargain outlet for only $20!  It has a much better home here in our Virginia house.   The plaid couch you see in the pic was a hand me down from Robb's parents - it has since found a better home elsewhere in the universe that is Craigslist.  The wardrobe has also been sold via Craigslist. 

The Bathroom:


This is another room where a "before" pic would be really helpful.  It looked NOTHING like this when we moved in! I spend one Sunday ripping up the old tile floor, but then we had professionals install the new (ceramic tile made to look like white marble) floor.  I'm happy to report that I installed the medicine cabinet and vanity and sink myself - with some help from my dad.  We had the tub reglazed, and a new shower door installed, and a tile surround installed to match the floor.  The paint we chose in this room was "Gull Wing Grey" by Sherwin Williams. 

So that's it!  That concludes my 2-part installment of memories about our DC house. Stay tuned for more junk drawer makeovers with my next post!